UCD PrePurchasing Overview for New Users
Welcome
If you have been directed to this page by your Food Chain Cluster purchaser, then you should now have access to the UCD Online Prepurchasing system (you were either added to an existing workgroup in the system or a new workgroup was created for you). If you work for multiple labs or groups, then you can be added to multiple workgroups. You will be prompted to select which workgroup to order from when you go to create a new order. Please review the important information about the system below before logging on. Contact your designated purchaser if you would like to arrange to stop by their desk to have them walk you through using the system.
Before participating in purchasing in the Food Chain Cluster users should review our IT Purchasing and Inventory Procedures.
Overview
The online prepurchasing system replaces the use of paper purchase orders. Rather than using paper purchase orders with inked signatures on them, orders are instead initiated online where they are routed to PIs for approvals and then to departmental purchasers for processing. Once items are received, users indicate receipt of items online as well. The system uses email notifications and we can configure workgroups for labs so that users can see all the orders within their workgroup. Note that in order to use the system a user must be added to a workgroup, which is associated with a set of accounts that orders will be charged to. Please contact your designated purchaser to add additional users to the system.
To use the system simply log on to: http://prepurchasing.ucdavis.edu/
Training
The campus provides training in the form of a few short YouTube videos linked below. We also provide some helpful tips, which we recommend you review before using the system.
Training Videos:
- How to Create Orders (15 minutes)
- How to Approve and Deny Orders (9 minutes)
- How to Configure Preferences (1 ½ minutes)
As noted above, you may also want to contact your designated purchaser to arrange to stop by their desk to have them walk you through using the system. Detailed information about the system is also available online.
IT Orders
If your order contains any IT equipment, hosted services, or software (see below list as reference), it must be reviewed by Food Chain IT prior to purchase. You should email foodchainit@ucdavis.edu as a first step for any orders for IT hardware, software, or hosted services. Please review the UCD Food Chain Cluster IT Purchasing and Inventory Procedures as reference. Items requiring an IT review prior to purchase include:
- Computers (laptops, desktops, and servers)
- Computers included in an order for lab equipment
- Mobile devices (phones, tablets, smart-watches, etc.)
- Software
- Software included in an order for lab equipment
- Any device that needs to be connected to the campus network
- Any device planned to store institutional data (this includes USB hard drives, and flash memory, which must be encrypted)
- Printers, monitors, scanners, cameras
- Hosted services
When ordering any IT items make sure you check the conditional approval toggle button on your order (this will route the order to the Food Chain IT team for review).

Helpful Tips:
- If you have questions about how to use the system or want to add additional users to your workgroups, please contact your designated purchaser and they will coordinate for your needs. Please note that this is a campus system created and maintained by programmers at CA&ES and designed for wide campus use. We do not have the power to make changes to the system (CA&ES does have a support mechanism and a process to submit suggestions for changes - click on the link to Help from the top menu once you have logged on to the system).
- When an order is submitted an initiator can select to note either an account # to use OR select an Approver (not both). If you select an approver instead of account #, please note the account # in the comments. We recommend you enter an account # for most orders rather than selecting an approver.
- Once you receive orders, you can go back into the system to note line items as received on each particular order. Each workgroup is set up with all users as “reviewers” so each user in your workgroup should be able to review all orders and mark items as received.
- PIs will receive notification emails when initiated orders are ready for their review/approval. Users can change your email notifications settings via the link to “Profile” in the upper right. Please do not disable the “note” notification even if you disable all other notification (this “note” field will be used by purchasers to deliver important notes to you about your orders).
- When submitting an order you will have a field to select a vendor. There is a search feature to find vendors that are in the campus financial system already. For some orders you may be using vendors that require online ordering and they will not show up in search results. In that case, you can add a new vendor. When selecting a vendor address if you don’t know which one to use, you should pick the vendor listed with “DEFAULT” in the name.
- If you select an approver for an order instead of an account, please select “Any Workgroup Account Manager” for Account Manager. Account managers will not be using the system (they will be reviewing orders at other stages of the purchasing process).
- The order form has a field at the top for “Justification”, which is required to submit the form. If you do not want to track order justifications, just put any text such as a period in that field.
- The order form has a required field for “Date Needed.” If you do not need the order urgently or by a particular date, then you can just select two weeks out from your order date as a default standard order time.
- When you log on, if you see a message display that says your browser is not compatible, please use another browser (Firefox, Internet Explorer, or Chrome are OK) or if you only have Internet Explorer available to you, please remove ucdavis.edu from your list of sites to view in compatibility view (go to Tools, Compatibility View Settings and remove ucdavis.edu).
How to Set up Auto-Approvals
Below are instructions for PIs on how to set up auto-approval if you want to have the system automatically approve orders under a certain amount when submitted by a particular user, such as your lab manager. Note that support staff cannot create auto-approvals for PIs (the faculty member must create the auto-approval themselves while logged on under their own account).
- Log on to the UCD PrePurchasing site here: http://prepurchasing.ucdavis.edu/
- Click on the big blue “Enter the PrePurchasing System” button in the middle of the screen. If you see a message about your browser not being compatible, please ignore it and proceed.
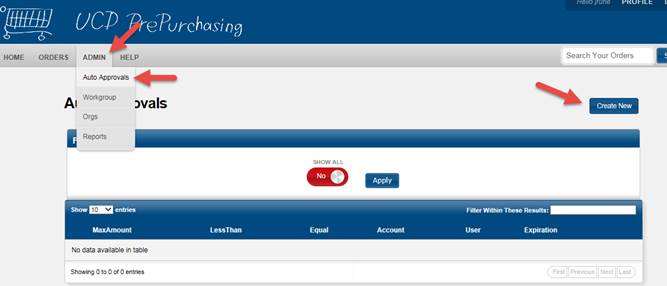
- From the top menu click on Admin and then select Auto Approvals. Next on the Auto Approvals screen click on the Create New button in the upper right.

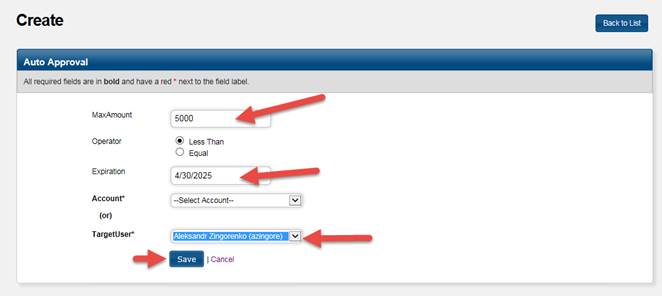
- Enter in the information for the auto approval including
- Amount (recommend you select “less than” and enter a limit no greater than 5000)
- Expiration (enter an expiration date, the default is one year from today’s date)
- Select Target User and select the user in question who you want to have auto-approval. This will allow the user in question to have their orders auto-approved if their order is under the max amount you have set and they are ordering on an account within your workgroup. Your lab workgroup contains all the accounts within your Org in the campus financial system.
- Click on Save to save the auto-approval.
- Do this for each user you want to have auto-approval in your group. You’re done!

